Productos
LTC4150 Coulomb Counter Breakout

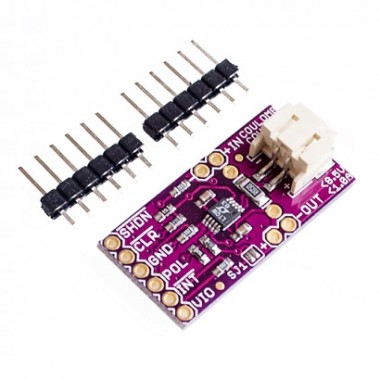
Este módulo sensor de bajo consumo permite monitorear la carga (en Coulombs) consumida por tu circuito, añadiendo además control a través de sus pines adicionales. Ideal para implementar un medidor de la capacidad remanente en una batería. Compatible con Arduino.
COD: HTHS0256
Peso: 0.010 Kg
Disponibilidad: Sin Stock
ARS 10547.00
El producto no está disponible para la venta en este momento
Características
Description:
Odometers are extremely useful for cars, they tell you how far you have gone, wouldn’t it be nice if you were able to have a device that does the same for electrical current? The LTC4150 Coulomb Counter Breakout is here to be your odometer for current. If you are wondering: a coulomb is defind as, to put it simply, one amp for one second. This breakout is capable of constantly monitoring the current your sensor is using, is able to add it up, and will give you a pulse each time a given amount of amp-hours have been used. When used effectively and if you start with a full battery, you’ll always know exactly how much of it is left!
At one end of the Coulomb Counter Breakout are headers labeled IN and OUT. Connect your battery or power supply to the IN header or JST battery connector (they’re identical), and connect the OUT header to your project. At the other end of the Coulomb Counter you’ll find a header with six pins. These are the pins you’ll need to connect to your microcontroller and include VIO (Voltage Input), INT (Interrupt), POL (Polarity), GND (Ground), CLR (Clear), and SHDN (Shutdown). Simply install this breakout out between your power source and your circuit, that way all the current your circuit uses needs to pass through the Coulomb Counter to be measured.
Features:
- Operating Voltage: 2.7V - 8.5V.
- Operating Current: 1A.
- Indicates Charge Quantity and Polarity.
- ±50mV Sense Voltage Range.
- 32.55Hz/V Charge Count Frequency.
- 1.5μA Shutdown Current.
Documents:
- Schematic.
- Eagle Files.
- Hookup Guide.
- Datasheet (LTC4150).
- GitHub (Example Code & Design Files).
- Product Video.
Interface pins:
At the other end of the Coulomb Counter, you’ll find a header with six pins. These are the pins you’ll need to connect to your microcontroller. Depending on what you want to do, you’ll need at least the first four pins:
| Name | Function | Direction | Notes |
| VIO | I/O Voltage | Power | Connect to 3.3V or 5V depending on your system. Note that you may need to change jumper settings (see above). |
|
INT
|
Interrupt | Output (from CC) |
Goes low when 0.0001707 amp-hours have passed through the board. Is cleared (goes high) when CLR goes low. Connect to an interrupt input pin. |
| POL | Polarity | Output (from CC) |
Indicates direction of current flow. Low = current from IN to OUT (discharging). High = current from OUT to IN (charging). |
| GND | Ground | Power | Connect to GND pin on your system. |
| CLR | Clear | Input (to CC) |
If INT is low, make CLR low to reset INT. This is done automatically if SJ1 is closed (ties CLRand INT together). This pin can be left disconnected if SJ1 is closed and you are using interrupts to sample INT. |
| SHDN | Shutdown | Input (to CC) |
If SHDN is low, the chip will be held in reset. There is a pullup resistor from this pin to VIO, so if you leave it disconnected, the board will remain active. This pin can be left disconnected if you do not need the shutdown function. |
PROTIP: When you see a signal name that contains an asterisk or has a line over it, that’s an indication that this signal uses “negative logic”. In negative logic, a low logic level means the signal is asserted or active. Thus, if you see a signal named RESET, you must provide a low signal to reset the part, and keep it high at other times.
Note that the Coulomb Counter is powered by the IN header (usually your battery) and not by the VIO pin, which is used only as a voltage reference for the output pins. This is so that the small amount of power used by the Coulomb Counter itself is included in its measurements for maximum accuracy. The Coulomb Counter uses under 1mA when it’s running, and you can use the SHDN (shutdown) input to reduce its power consumption further (though it will not be able to keep track of current use while shut down).


