Productos
RS-232 Cape

Módulo de comunicación RS232 para BeagleBone configurable para usar difrentes UART del AM335x
COD: BBSERL03
Peso: 0.100 Kg
Disponibilidad: Sin Stock
ARS 76724.00
El producto no está disponible para la venta en este momento
Características
Descriptions
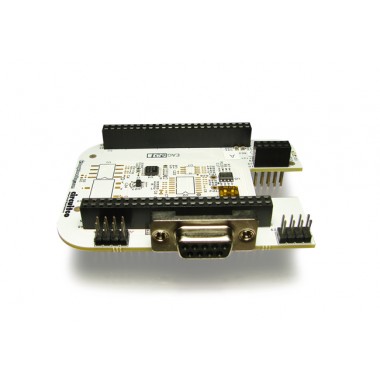
The BeagleBone RS232 Cape provides an RS232 interface to the BeagleBone via a standard D-Sub 9 female serial connector. This connector is located to the side so it doesn't interfere with any capes stacked above it. By default, the BeagleBone RS232 Cape uses UART2 port on the AM335x for RS232 connection; however, users will have the freedom to choose among UART1, UART2, UART4, and UART5 ports.
Software Support & Compatibility
-
BeagleBone RS232 Cape revision A1
- Compatible with BeagleBone using Angstrom release 06-18-12 or later. The default UART port in software is UART2.
- Compatible with BeagleBone Black using Angstrom release 2013-06-20 onward. UART5 is not supported without disabling the onboard HDMI; the default UART port in software is UART2.
Getting Started
Required setup:
- A BeagleBone RS232 Cape
- A BeagleBone (with supporting software)
- A USB cable
- An RS232 compatible serial cable (the connector on RS232 Cape is female; therefore, you will need a male D-Sub to USB or D-Sub to D-Sub)
- A computer
Following the instructions below to start using your BeagleBone RS232 Cape:
- Mount the BeagleBone RS232 on top of BeagleBone
- Make sure the micro SD card using with BeagleBone has latest Angstrom image.
-
Connect the BeagleBone RS232 Cape to the computer using a RS232-compatible serial cable. Remember the port number of this connection.
- Note: In Windows, the serial port number can be viewed under “Ports (COM & LPT)” section inside “Device Manager”. To open the “Device Manager” windows, right-click “My Computer”, choose “Properties”, select the “Hardware” tab, and click “Device Manager”.
- Connect the BeagleBone to the computer using a USB cable. Remember the port number of this connection. This will also power up the BeagleBone.
- Open a terminal application (Teraterm, Hyperterminal, etc) and open new connection with following settings: baud rate - 115200, data – 8 bit, parity – none, stop – 1 bit, flow control – none. Select the port corresponding to the RS232 connection.
- Open a second instance of the terminal application and connect to the USB serial connection using the same settings as above.
- Hit the reset switch S1 on the BeagleBone. The BeagleBone is now rebooting inside the USB serial terminal window.
- Press “Enter” to stop the booting process at UBoot. If missed, hit the reset switch again and press “Enter” before the UBoot count down stops at zero.
-
At UBoot, run the following commands to temporarily use the RS232 connection:
- setenv console ttyO2,115200n8
- boot
-
BeagleBone will continue the booting process; however, the kernel messages will now show up inside the RS232 terminal window. You can now start using the RS232 connection via UART2.
- Note: This RS232 connection is temporary. To permanently use the RS232 connection, you need to change the environment variables of UBoot.
Electrical Specifications
| Compatible Serial Ports | UART1 |
| UART2 (default) | |
| UART4 | |
| UART5 | |
| Power | 3.3V via expansion header |
| Indicator | Power LED |
| Connectors | Two 46-position connectors |
| One 10-position connector | |
| One D-Sub9 serial connector |
Mechanical Specifications
| Size | 3.40" x 2.45" |
| Layers | 4 |
| PCB Thickness | .062" |
| RoHS Compliant | Yes |
Signal Usage
The BeagleBone RS232 Cape uses 7 signals including:
- DGND
- VDD_3V3EXP
- RESET
- I2C_SDA
- I2C_SCL
- UART2_TXD
- UART2_RXD


